Immediately Exporting Documents (EDA)
Important: Exporting documents is an optional feature depending on your Policy & Procedure Management license. If you have questions about or want to purchase the Export Documents module, contact NAVEX Customer Support by submitting a request in the Community.
As a global administrator or a site administrator, you can export Emergency Document Access (EDA) documents from the Policy & Procedure Management system. The EDA documents and optionally, their attachments, export to a specified location along with a standalone browser from which you may find documents from a simplified organizational structure.
The Export Documents module includes a certain number of exports per year. Each time you perform an export, regardless of its type (single export, export with metadata, or EDA), you use one of your annual export instances. If no documents meet the selection criteria, the export is cancelled. An email notification is sent to the user and the total allowed number of exports is not increased.
The process for selecting documents for an EDA export consists of organizing documents for the export and then determining security levels that you want to include in the export file.
Important: Exported documents are no longer under version control.
Export EDA documents immediately
- Click Settings & Tools > Tools, and then click Data Exports.
- Expand the Document Exports pane, and then click Start New Immediate Export.
- In the Export Documents menu, click Emergency Document Access (EDA).
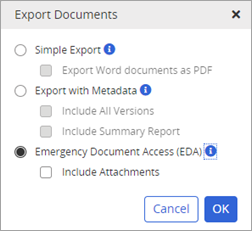
- (Optional) Do any of the following:
- Click Include Attachments to have attachments included in the export file.
- Click Export Word documents as PDF to export documents as PDFs. This option allows you to open the source document in the browser.
- Click OK.
- For Arrangement, select either Department or Category for how you want documents organized in the EDA Viewer.
- The Department field will contain All Departments by default. Either leave the All Departments selection or select a single department.
- The Category field will contain All Categories by default. Either leave the All Categories selection or select a single category.
- For Site, select All Sites or a single site.
- For Security Level, select a security level for the documents you want to export. Available options are Unrestricted - Documents with the All Users or Public security setting, Restricted - Documents with an elevated security level setting, and All Documents - Restricted and Unrestricted documents, combined.
-
Click OK. An Export In Process bar displays. The time it takes to complete the export depends on the number and size of the documents.
-
When the export completes, click the Exports Ready To Download link. A file saves to your Downloads folder.
Note: Documents are only valid for download for 7 days from the date of the initial export.
-
Extract the .zip file contents to a location of your choice. In the folder, double-click the index.htm file to open the EDA Viewer. The date of the export is shown in the Browse bar of the EDA Viewer.
The following list includes the names of the columns in the EDA Viewer grid.
Reference # Keywords Document Attachments Publication Date Version Last Modified Date -
In the Document column, click the link to open the document.
-
In the Attachments column, click the link to open the document's attachment.
-
In the Search box, you can search for a document title and keywords.
Important: Because it requires no authentication (login) to open the EDA Viewer, there is no access restriction for the documents it contains. For this reason, controlling who has access to each EDA Viewer using a network folder permission scheme is a best practice.
-
This publication was written and produced at NAVEX Global, Inc., Lake Oswego, Oregon. This publication or any portion thereof is confidential and/or proprietary and may not be reproduced or used in any manner whatsoever without the express written permission of NAVEX Global, Inc.
Copyright © 2026 NAVEX Global, Inc. NAVEX Global® is a registered trademark/service mark of NAVEX Global, Inc. The NAVEX Global® logo is a trademark/service mark of NAVEX Global, Inc. Unauthorized use of NAVEX Global, Inc.’s trademarks/service marks is strictly prohibited without prior written permission from NAVEX Global, Inc.